Tag Archives: arcgis

Custom Print Tool for 3D SceneView in ArcGIS Javascript API 4.4

Custom Print Tool for SceneView in 4.4

**DISCLAIMER**the resulting pdf is in 2D.**

Here’s a link to my sample:

JS Bin – Collaborative JavaScript Debugging 

*your browser will probably block the pdf by default, as it appears in a new tab or window

This is a print tool I made for a 3D app. It works by spinning up a transparent 2D map of the same area when the print button is clicked, and then uses that 2D map for the print task. When the tools modal is closed, the 2D map container is emptied, so it is not running behind the scenes unless the print modal is open. The widget was made using materialize, and the print task uses the default ArcGIS Online print (export web map) service.

I also implemented some simple error handling for the case when the browser’s popup blocker blocks the requested pdf like this:

function printResult(response) {
   var url = response.url;
   var newWindow = window.open(url);
   if (!newWindow) {
      $("#enablePopupModal").show();
   }
}

Hope this helps anyone trying to print in their 3D app!

Cheers

Sample 3D Draw Line/Measure Tool for ArcGIS API for Javascript 4.4

Sample Draw Line / Measure Tool for Sceneview in 4.4

**DISCLAIMER* the resulting length is only a 2D measurement**

Here’s a link to my example:

JS Bin – Collaborative JavaScript Debugging

I threw together a draw polyline tool that drapes over the world elevation layer in a sceneview, and adds a text graphic showing the 2D length of the line upon completion. This is what I’m using in my app until the API supports a proper 3D measure tool. Just wanted to share it incase someone is trying to incorporate at least some level of measurement functionality in their 3D app.

I also want to give credit to whoever made this sandbox example:

Draw polygon for spatial query | ArcGIS API for JavaScript 4.4

I used that sample as a starting template for my tool, only adding a few tweaks to get it looking good in 3D, and to add the measurement functionality.

I also have a polygon version of this tool too. If anyone would like to see it just ask!

Hope this is helpful.

Cheers,

Drew

arcgis js 3D camera setter

ArcGIS JS 3D Camera Setter

tl;dr
A simple way to grab arcgis js 4.x 3D camera json by copying the current camera state to your clipboard:

http://dev.brightrain.com/camera-setter/

code here

https://github.com/BrightRainSolutions/arc-camera-setter


Moar

I’m building a 3D mapping app using the ArcGIS JS 4.x API that requires a new 3D camera position for each instance. This presented a funny problem because it is rather tedious to capture a specific camera position. Unlike a simpler, 2D map, in which you only have to set an extent or a center point with zoom level, a 3D camera has more variables that require you to take a pilot’s view of the earth. You need to set the position of the camera including coordinates and height, as well as the tilt of the camera and it’s heading.

While it’s kind of fun to just tweak it and refresh the page to get it just right, it takes a lot of tweaking!

So I built a simple tool that captures all of the properties of the camera and formats it in the json required to set the view of your 3D map and copies it to your clipboard.

It’s simple! A camera json object is created for the current 3D map view and displayed in the right panel. The copy button copies the json to your clipboard for direct use in your arcgis js 3D map view (sceneview). Just paste it right into your code.

Give it a try here

http://dev.brightrain.com/camera-setter/

and you can find the code here

https://github.com/BrightRainSolutions/arc-camera-setter

It includes a sample feature service for reference, but obviously you don’t have to. The 3D scene will work just fine.

Also, this could be used to create tour by using a series of camera positions, for example. (Potential future post…)


Stuff used

arcgis js api 4.x

clipboad js

icon from Icons

map-autocomplete

Autocomplete Map Search:

Autocomplete multi-source Search with ArcGIS REST services

Search First. Search is expected in modern web applications. And what better use of a map application than to start typing what you want, be shown a list of relevant suggestions, pick one and be taken there with potentially some useful context info.

In several posts in the great geospatial blog, MapBrief, Brian Timoney has mentioned a Search First approach to web application building. The most recent example:

Good Thing #1: A Big, Obvious Auto-Complete Text Entry Box

I couldn’t agree more. It is core to nearly every application I build and is of far greater use than most of the novelty web mapping ‘standard’ tools <uhem, looking at you, measure tool>.

Search is the number one request I get in web mapping applications so I thought I’d share how I put all the pieces together to get an autocomplete search up and running with esri ArcGIS REST services.

I’ll walk through the steps to get a fully functioning autocomplete map search feature.

Here’s the source on github and a working sample application.

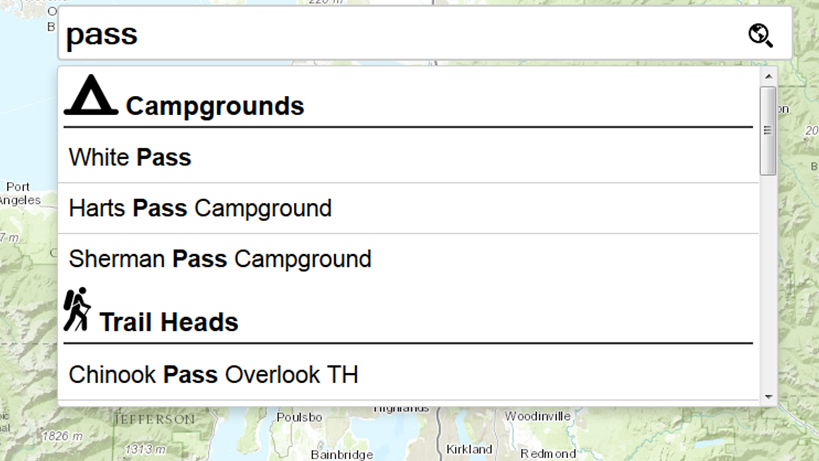
Let’s build an autocomplete search box for recreation sites in Okanogan-Wenatchee National Forest.

This autocomplete solution uses twitter typeahead js, the bundled download includes the bloodhound suggestion engine and the jQuery plugin, all of which we’ll use here.

Once you get typeahead all hooked into your application, the only html you’ll need is an input for your search and the rest is done via javascript.

<input id="search-box" type="text" placeholder="Search...">

There are three parts to getting things going:

  1. Define and initialize suggestion engines
  2. Wireup typeahead with jQuery including adding the engines and defining the UI
  3. Handle the event when a user selects one of the suggestions

Define the Engines

First, we’ll define an engine (bloodhound) for each source to include. In this example we’ll use four:

 icon-camp

A campground (arcgis) feature service layer

 icon-trail

A trail head feature service layer

 icon-ski

A ski area feature service layer

 icon-map-marker

The esri geocoder service


Construct the remote source(s)

This is the most critical piece of the whole operation and requires some consideration because you potentially have options here. The remote source needs a url to send a request each time the user types characters. Selecting the best option will result in the best performance. Here are our best options with arcgis REST services:

find

If you have a map server, find is a great option if you want to search multiple layers in the same request. I’d say if you have this option, take it.

query

If you only have a feature server, this is for you. You can either query a layer individually or query the entire feature server. We are going to query each of our feature layers individually.

suggest

Suggest is currently meant for geocoding, for now, but I suspect a locator service could be constructed to take advantage of this service. I’ll make the assumption that this is the best option because it is intended specifically for search.

You could roll your own locator service that supports suggest (ArcGIS 10.3 +). We’ll use the world geocoder and take advantage of suggest.

The code to build the campground site suggestion search engine and initialize it:

Here’s the engine setup for the esri world geocoder service. Note the searchExtent parameter. This can be used to limit the geographic area of you suggestion results. In this case it is (roughly) Washington State.

You can see that in both of these engines we set the ajax property to show the spinner before the request and remove it when the request is complete. These calls can step over each other if you have several engines but works pretty well here.


Add the engines and style the suggestions

Now we need to setup typeahead itself and wire up the engines and tell typeahead the properties we are using for each suggestion generated by the engines. We will also define how the suggestions will be displayed in the drop down.

First, turn the input box into a typeahead via jQuery and set some options like so

minLength is the number of characters a user types before suggestions start firing.

Next tell typeahead about the engines to use, here’s our campground setup

We’ve just told typeahead that the name of this source is ‘camp’, the displayKey is ‘name’, the source is our camp bloodhound engine adapter and set the template to use for the header (a campground icon inside a header tag).

You’ll do the same for all sources chaining them together. The whole set of sources looks like this:

Define what will happen when a user selects a suggestion

Okay, cool, we’ve got some suggestions for our users.

suggestions-ahead

Now we need to setup what will happen when one is actually selected. So we simply set up a jQuery event handler and chain it to our typeahead declaration. the event will pass the callback function the element and the selected datum (generated from the engine).

For the feature service layers we have set the datum to include the objectId (see the filter function in the bloodhound engine definition). This allows us to fetch the feature along with its’ geometry via another ajax call. We can then get attributes, zoom to it, make another call to get more info, whatever you want. In this sample we simply zoom to it and put a text label displaying the name right on the map.

For the geocoder a name and ‘magicKey’ are defined in the datum which allows us to call back to the service to retrieve the feature via a call to the find REST end point. For this one we simply zoom to the extent returned. Here’s the whole event handler:

That’s it, complete autocomplete.

You have an incredible amount of control over display via css as well. Here is what I’ve used in the sample app:

There are many more options available to you in this solution so please review the documentation for further info. I am very impressed with the flexibility of typeahead so if this setup doesn’t quite work for you I suspect there are ways to get it going.

BTW, If you are using esri-leaflet you can use the great geocoder plugin that also allows you to search via a geocoder service as well as map and feature services like we’re doing here.

Finally a shout out to Bryan McBride for his excellent mapping template, bootleaf, that I used as a starter for this solution.

The whole project is in a github repo here

https://github.com/brightrain/arcgis-autocomplete

And you can see it in action here

http://dev.brightrain.com/map-autocomplete

Updated geoconverter: { geoJson } <> { arcJson }

I put together a simple geo-converter a while back (and posted about it) that converts geojson to arcjson\esrijson. I needed it to get some polygons in an arcgis feature service. I have updated that converter to also convert from arcjson to geojson as well. I used it to pull arcjson from an ArcGIS Feature Service via a query against the REST API and convert the results to geojson.

The geoconverter tool
http://brightrain.github.io/geoconverter/

source

I pulled the arcjson formatted data from City of Fort Collins ArcGIS web services

A query against the Neighborhoods layer, like so:
http://gis.fcgov.com/FTCArcGIS/rest/services/FCMaps/MapServer/17/query?returnGeometry=true&geometryType=esriGeometryEnvelope&geometry={%22xmin%22%3a-122%2c%22ymin%22%3a40%2c%22xmax%22%3a-80%2c%22ymax%22%3a50%2c%22spatialReference%22%3a{%22wkid%22%3a4326}}&inSR=4326&spatialRel=esriSpatialRelIntersects&where=%28HOODDESC+IS+NOT+NULL%29&outSR=4326&outFields=*&f=json

Results into the geoconverter

geo-arc2

Created a MapBox map with it

fchoods

And here’s some geojson to try out, Major League Baseball Stadiums
mlb
raw data

Play ball!

arcgis fulcrum add in

In researching the fulcrum API for potential use in a project I thought I’d push it a bit further and ended up building a tool to import fulcrum data into ArcGIS. This happens, sometimes for the good and sometimes for an exercise in clicking. This time for the good as I ultimately created a couple of useful things:

1. a c# wrapper that turns fulcrum apps and records into usable .net objects

2. an ArcGIS add-in that imports all records from a selected app into a new feature class

The wrapper turns fulcrum api json responses into c# dictionaries and lists via the JavaScriptSerializer class and creates instances of custom fulcrumrecord and fulcrumform objects. This went pretty smoothly because the fulcrum api is both documented and well thought out.

I then used this wrapper to build an ArcGIS (ArcMap) add-in that imports all records from a selected app into a new file geodatabase feature class and adds it as a layer to the current map document. This is implemented via a separate class that digs into the depths of the ArcObjects model to create the feature class and populate it. If you’re familiar with ArcObjects this should look pretty familiar, if you are not, you might want to shield your eyes.

The code is available on github and you can find it here:

https://github.com/brightrain/arcgis-fulcrum-add-in

You can also just grab the .esriAddIn file from here and install it:

https://www.dropbox.com/s/5u0d66nylho4sf7/fulcrum.esriAddIn?dl=0

(BSD license disclaimer applies, truly alpha at this point)

Use is pretty straight forward, first you need to get your fulcrum api key from your profile, http://web.fulcrumapp.com/users/api then sign in. Then you’ll want to either create a new file geodatabase or determine which one you’d like to use. Both of these go in the Settings (gears on fulcrum add-in toolbar)

Notes:

The import is a read-only snapshot of the current records in the selected app. This can obviously be extended any way you like but, as-is, the feature class created is static.

Initially I added a setting to define the folder where photos were to be located and  the (first) photo for each record was downloaded to that location. The feature class then contained the full file path to the photo. I quickly realized that this could take a very long time depending on how many recordsphotos there are. So I altered it to populate a field with the link to the photo on the fulcrum site. However, there is also a branch of the git source that contains the original functionality to define a location and download the photo to disk.

Currently only the first photo is linked todownloaded. This could be handled by creating a separate, related stand alone table to hold links to multiple photos linked via the record id.

Recursion needs to be implemented in a couple of places to fully support the fulcrum data model. Most notably in the Section element type; the application currently ignores sections. But there can be an infinite number of nested sections that contain child elements.

It’s worth a mention that, if you’re looking for a COTS solution, Arc2EarthSync (beta)  now includes fulcrum as a provider that acts to keep fulcrum data up to date. I understand there are also plans to make it bi-directional.

Automate Updating an ArcGIS Online Feature Service

For many of my clients purchasing and managing ArcGIS Server has been out of the question based on limited IT and GIS resources. So for years I’ve been testing hosted services that would allow them to get maps out to their customers via the web. None of them allowed for timely data updates to ever changing data however. So naturally when ArcGIS Online rolled out I had to take it for a spin to see how it might work.

My goal is to publish a map service to ArcGIS Online once and be able to update it through a simple console application that could be launched at some interval (hourly, daily, weekly).

Here’s what I did:
Publish the feature service via ArcGIS Desktop 10.1
Once you have an ArcGIS Online account and ArcGIS Desktop 10.1 installed it’s easy peasy to publish a feature service.  (how to)

Create an ArcGIS JavaScript web application for testing
In order to mimic a real world scenario as best I could (for a geo dev anyway) I created a fairly simple web map that shows recreation sites on top of a topo base map. Clicking on the map then displays that general area in a floating box with an aerial base and info about a rec site as the title if one is within clicked range. Simple (yet I have spent far too much time just browsing it).  I’ll be honest, that was the fun part. The feature service is obviously also available directly in an ArcGIS Online map.

Develop the .Net console application to update the feature service data from a local source
My console app is using the ArcObjects .Net SDK to access a feature class within a file geodatabase to mimic my clients’ typical GIS infrastructure. This requires an ArcGIS license of any flavor to be available from the running server. This could just as easily be any format you like however since all we’re really doing is building JSON objects to pass directly to the ArcGIS Spatial Data Server REST API.

I used brute force in deleting all features and then adding them all back but I could imagine something a bit more elegant. I also noticed in Fiddler that ArcGIS Online uses the applyEdits method for any edit operation (delete, add, update). applyEdits also allows you to cancel the entire request if anything fails. But I’m going for simplicity here.

Here’s the C# code that works to make these updates:


You can also find the source project on github

There’s lots of room for improvement here such as serializing the json and handling the updates more elegantly but this is a working example of how you might keep a hosted map service on ArcGIS Online updated.

I’m guessing there are use cases I hadn’t thought of and would love to hear them.